Wednesday, 22 May 2013

Send and Receive WhatsApp Messages on Windows PC


WhatsApp is popular free messaging client which is available for iOS, Android, Nokia and Blackberry, but still we have no client for Windows PC officially released by the WhatsApp team. Well you can imagine having WhatsApp on your PC and how fast you will be able to send and receive text messages as you always be on one device so you can handle everything right there. So we found an unofficial client which is supposed to be a dummy version of Android running on your PC.

BlueStacks App Player Android Emulator

BlueStacks App Player helps you install WhatsApp and thousands other application because its an Android operating system running on your Windows PC. Now obviously its not like you will get that same kind of experience you can do with a touch phone and Android installed on it but still if you are a WhatsApp fan than I must that this software is must for you because WhatsApp experience on this one is simply unbelievable faster texting and media exchanging.
bluestacks-app-player-windows

Steps to Install WhatsApp on BlueStacks App Player

So if you are interested in using WhatsApp right on your PC that you can grab some installation knowledge from below and start experiencing right now.
  • Download BlueStacks App Player for Windows PC.
  • After you have downloaded the above software, start installing it and it will start downloading its package from the internet, it will take some time so sit back and have a cup of coffee.
  • So after downloading it will install and now you will see their user interface, now you have to sign up for your new account or if you already have their account than you can login.
bluestacks-whatsapp-messenger
  • Now just search for the WhatsApp like in the above image or find it from the popular downloads hovering right above in the Rocket Dock, after you find it click on it and it will start downloading the app.
  • After WhatsApp is installed click on it and you will see a Terms and Conditions page where you have to click on Agree and than you will be on their main phone verification page.
bluestacks-whatsapp-verification
  • Now just select your country & than insert your mobile number & than click on OK.
bluestacks-whatsapp-verification
  • Now it will start the process of sending you the verification message on your mobile, if that thing fails you also have an option to call your number for the verification message. So now just insert that code and click on OK boom you have successfully activated your WhatsApp messenger on your Windows PC.
bluestacks-whatsapp-messages
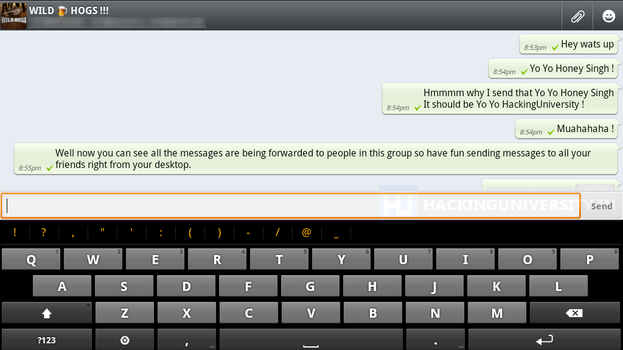
  • So now WhatsApp is ready for some action, select your already created groups, if you were having one on your mobile or you can start sending text or media messages to your friends and create another new group, so I was just messing around my group Wild Hogs, and tried sending some messages and delivery was amazingly fast and responsive.
So now enjoy WhatsApp on your Windows PC with this amazing BlueStacks App Player, well you can also download and install other amazing Android Application which you can search and than download, hope you liked this lengthy tutorial, please share it with all your friends.

How to Check BSNL 2G - 3G Internet Data Usage Balance

As every big telecom firm has introduced 3G plans the prices has really shocked the whole nation on what they charge to use little amount of internet. Well but obviously with things some relief plans are also introduced so they have plans which you can opt for to get more usage in some what less money. Well if you use 3G internet or even 2G plans than you might wanna check out for usage you made anytime possible so below are the official numbers that you use to check your 2G or 3G balance.
  1. For Uttar Pradesh BSNL Prepaid Numbers :: 
    • Dial *123*6#
  2. For Tamil-Nadu BSNL Prepaid Numbers ::
    • SMS Data2G to 53733 and Data3G to53733
  3. For Kolkata BSNL Prepaid Numbers ::
    • Dial *123*10#
  4. For Kerala BSNL Prepaid Numbers ::
    • Dial *124*1#
  5. For Gujarat and Maharashtra BSNL Prepaid Numbers ::
    • Dial *112#
So these codes will work for the states listed and maybe for the unlisted ones too, do comment if you find out any difficulty using them or if they do not work I will update the post with working ones.

Megaupload Service is Back with New Avatar Mega.co.nz


So earlier due to copyright issues and many FBI raids Megaupload and other uploading websites were taken down, some sites automatically gave up their uploading service and only allowed people to purchase and upload sincere files without any copyright issues. So Megaupload was charged for copyright charges and much more and its CEO was arrested, well but after that their were many rumors that Megaupload will come back soon, and his creator even uploaded many messages online stating that he will surely get back all those services. Well and we even came across the rumor about accessing Megaupload using IP address as they did not have any name after the complaints.
So now Kim Dotcom the creator of Megaupload has come up with a new avatar of Megaupload Mega.co.nz that's redesigned much more preciously and gives that same easier way to upload your files and share them with your friends and family. Now Kim has even teased an earlier version Mega called "MegaBox" that was uploaded at his own personal website. So now he has come up with the final working version of his website.
mega.co.nz-website
So Mega.co.nz the superior and new version Megaupload that was used by millions of people to upload their files is now live and is working pretty perfect. So now the best part again about this uploading service is that you can upload anything being anonymous, so there is not need to create an account or sign in to your account before uploading files, you just need to visit their website and drag your files to get them uploaded.
Now the advantage of creating your personal free account is that you will get free 50GB storage + you can manage your files easily. So if you wanna share some folder that you have created you will need to register to do that, as you won't see any sharing folder feature until you signup at their website.

Mega.co.nz Interface

Well the interface is totally redesigned and looks awesome, the graphics they are using is pretty outstanding, everything is simple to use and works great, you can easily create folders store your files, drag your files to trash can to delete them and much more.
Mega.co.nz-interface

Mega.co.nz Downloading

Well now Mega is much more secure, its has pretty limitations on downloading so its not like certain download limit is there but it's a secure key system, so if you just pass the download link to your person without that key attached to that file than he needs to enter that key to unlock the file and get download started check below screenshot.
Mega.co.nz-download-page
So if you pass him the direct link that the download will start on the go but still it needs some time to prepare the download, and there is another bad part that you cannot download files using IDM or other download managers, as it will download in your browsers inbuilt downloader. So that's another little bad part about this service.
Well overall it's a good service and hope this time it does not get into copyright issues, so possibly it will rule again as the king in uploading world bypassing heights of Mediafire with its big file size limit. So have fun using this service and do comment if you think their needs to be some correction in this post.

Reduce Chrome RAM Consumption by 95% using "OneTab"


While using Chrome you might have faced that crashing face problem used to come and your webpage is un-loaded, well that due to RAM problem as you are opening too many tabs it simply consumes more and more RAM that makes your PC slow and as last crashes the tab as it does not have much more RAM to hold all those tabs. Well there is a simple solution to that using "OneTab" chrome extension.
"OneTab" chrome extension simply converts all your tabs into one tab and display's the list of URL's you have opened so far, so now clicking any one URL will open a new tab and lesser RAM will be consumed. So it simply decreases the RAM consumption upto 95% that's really a good thing for ultimate smooth browsing.
onetab-extension
Now the "OneTab extension comes with easy option's so you can easily restore all the tabs and delete them at once, its really handy. Now just install the extension from right hand side and then after your installed just click on the icon to create one tab from the tabs.
Now it will display a list of URL's that were earlier opened in new tabs, now you can click on any link to open it in a new tab. So now that's it now lesser RAM is consumed but you still easily browser smoothly. Do comment if you find any problem using it.

Automatically Change Background Color on Refresh in Blogger


Have you ever wondered to provide your visitors with a fresh look everytime they refresh your blog or maybe visit one or another article, well now with easy CSS and JavaScript's hacks you can apply few easy tweaks that can make your work a lot easier. Well yes we are talking about changing our blog's background color everytime a person refreshes your blog, so he would be greeted with a new background color.
So I do not have any demo for this effect but I am using this effect at the time of posting this article so if you are reading this article pretty late you might not be able to see this effect, but it's a simple CSS overriding effect so it simply adds a new color HEX code everytime a person refresh's your blog and color's are randomly selected. So if you wish to add this effect to your blogger blog just check below  steps.
  1. Open Blogger > Template > Edit HTML.
  2. Now press Ctrl + F and search for </head> tag & paste below code above it.<script>$(function(){function e(){return"rgb("+Math.round(Math.random()*255)+", "+Math.round(Math.random()*255)+", "+Math.round(Math.random()*255)+")"}$("body").each(function(t){$(this).css("background",e())})})</script>
  3. Now just Save Template and refresh your blog to see this effect.
So now everytime you refresh your blog you will see background color changing randomly, so you open any post and you will see different color. So that's it hope you guys liked this article, if you find any problem do comment.

How to Extend Window's 7 Trial Genuinely for 1 Year Easily


Earlier I posted on extending your Windows 7 trial period by 4 months for approx. 4 times. But that thing is limited and we cannot extend it after-wards for more but I found an awesome way that can extend your windows 7 trial for approx. 1 year and that too totally genuine, so we are not going to use any keygens, warez software's but it's a official trick and it works like a charm.
So now just jump into below steps and start extending your free windows 7 trial period for approx. 1 year, have fun :)
  1. Simply install Genuine Trial version of Windows 7 without entering any Fake or Pirated Product/License Keys.
  2. Now when Windows is installed and trial is going to be over simply open CMD as an administrator and type slmgr -rearm exactly into it and click enter.command-prompT
  3. Now after doing this something will Pop-up like command completed successfully restart system s restart the system and you will get 30 days back that’s purely genuine.
  4. Now This trick is valid only for 4 months means that you can run this command only 4 Times to get 30 days trial back, so we are going to mod this trial times and extend them to 8 times means valid 360 days genuine Windows 7 Trial pack.
  5. So now go to RUN and type regedit to open the default Windows Registry Editor. After you have opened it you will see the registry editor having 5 main folder we are going to navigate to the specific folder and we are going to modify a value.
    regedit-tweak
  6. skip-rearm
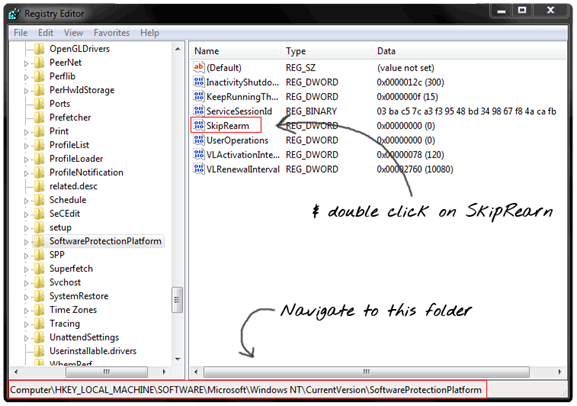
So you have to navigate to above folder as mentioned in the image and then double click on SkipRearm.
  7. Now you have to change the Value from 0 to 1 to extend the times you can reset the Windows 7 Trial Pack like below image.
  8. That’s it now simply click on OK and you are ready to go reset it as soon as trial is going to be over with slmgr -rearmcommand make sure you open Command as an administrator.
So that's it guys now you can easily use the extending command everytime your trial is over, well if you face any problem do comment I will surely fix that out too.

UC Browser 8.6.1 for Android Released Download Now


UC Browser is obviously the best browsing client for Android users who really love to browse internet on the go with its bulk in features it competes with all the major browsers and somehow tops them out. Well the latest 8.6.1 release is out by the company which brings many improvements to its interface and feature sets well features are discussed below you can have a look at them.
Now the User Interface is entirely optimized for better browsing experience. Now you can add a refresh button, night-mode button and feedback button. Automatic lite or mobile version request according to mobile network. Speeds are literally improved. Content Recommendation specially for Indian Users. 4.1 Jelly Bean support added have fun. Now they have even rebranded the logo that brings a nice squirrel with blue base.
Now there new homepage update brings possibility to add more websites, and now you can even search for new website's by navigating on their homepage. Now if your are downloading something and connection is broken it will automatically try to reconnect it for you and then even start that broken download for you. Now all the unsupported languages will be displayed properly which were earlier not displayed properly.
So now many features combined together to create an awesome browsing experience on your android device, well you can download it using this play store link or of you want to directly download the .apk file to your desktop you can download it by choosing option on the right, then you can shift that file to your device and install it.